

Step 1 - Make Sure Your DUALSHOCK®4 is Properly Connected to Your PS4™
Follow these steps to below:
- Make sure that the PS4™ system and TV are turned on. The light should be white on the PS4™.
- Connect your DUALSHOCK®4 (micro USB port located on the back) to your PS4™ (USB port located on the front), using the USB cable that came with your PS4™.
- While the DUALSHOCK®4 and PS4™ are connected, press the PS button on the controller. You should hear a beep and the controller light should change from orange to white. This starts the pairing process. The light bar on the controller turns blue when properly paired.
If the light bar is not blue or the PS button is not responsive:
- Try a different USB port on the PS4™ you may need to fully charge your controller.
- If that doesn’t work try a different USB cable.
- If that doesn’t work, try a different DUALSHOCK®4.
- If none of the above work, try resetting your DUALSHOCK®4 controller. Go to Step 3 below.
Step 2 - Make Sure Your DUALSHOCK®4 is Fully Charged
Make sure your DUALSHOCK®4 is properly charged by using the USB cable that came with your PlayStation®4. Fully charging your DUALSHOCK®4 may take up to 2 hrs. While charging the light bar is orange. You can continue to play while the controller charging and plugged into your PlayStation®4.
Check the Charge on Your DUALSHOCK®4
The PS4™ will not charge your DUALSHOCK®4 controller when powered off.
- Press the power button on your PS4™ to make sure it is turned on.
- Make sure your controller is paired to your PS4™.
- Check the controller charge level, by pressing and holding the PS button for at least one second.
- On the PS4™ Quick Menu, check the lower left corner to find the icons for the controller and battery indicator. When the controller is fully charged, the battery indicator will display three bars. While charging, the battery indicator will flash one to three bars. See image below.

Step 3 - Reset the DUALSHOCK®4 Controller
Resetting the DUALSHOCK®4 controller can help with PS4™ connecting (pairing) and charging issues.
To reset your controller follow the steps below:
- Turn off your PS4™ and unplug it from the power source.
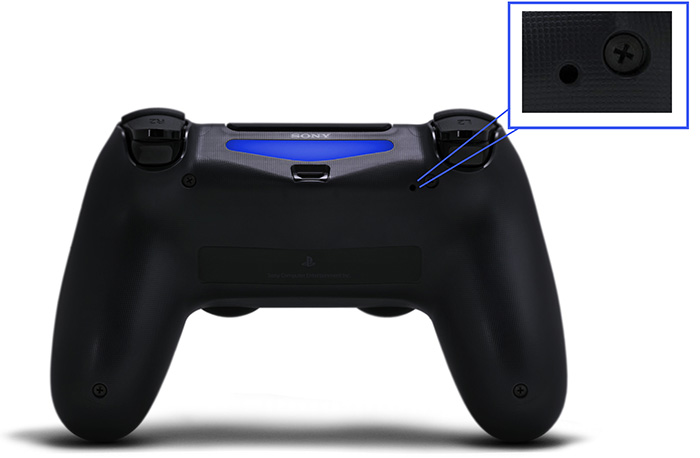
- Unplug your router or modem from the power source. Sometimes connecting issues are caused by internet router WIFI signals, unplugging it will help troubleshoot the connection issue.Locate the small reset button on the back of the DUALSHOCK®, located near the L2 button. See image below
- Use a small, unfolded paper clip or something similar to push the button inside the tiny hole. Hold the button down for roughly 3-5 seconds and release. See the image below.
- Then, re-connect your DUALSHOCK®4 (micro USB port located on the back) to your PS4™ (USB port located on the front), using the USB cable that came with your PS4™.
- Plug your PS4™ into a power source. Don't plug your internet router in at this time. Press the PS button on DUALSHOCK®4 controller and then log into your profile. If you don’t already have a user profile created, find the instructions here: Creating and Deleting User Profiles on PS4 .
When WIFI router is off and the light bar on the controller is blue
The issue is likely with your internet router and you need to contact your Internet Service Provider, or if you purchased your own router, contact the product manufacturer and make a request to change the broadcast channel.
When WIFI router is off and the light bar on the controller is white
This means your controller is not connecting to your PS4™. If the troubleshooting above didn't work and your DUALSHOCK®4 is with the one-year warranty period, you can send your DUALSHOCK®4 in for service. Visit the Fix & Replace page for more information.
Charging Your DUALSHOCK®4 in PS4™ Rest Mode
The steps below walk you through charging in Rest Mode:
- From the PS4™ home screen, go to [Settings] > [Power Save Settings].
- Scroll and select [Set Features Available in Rest Mode].
- Select [Supply Power to USB Ports] select [Always] from the menu on the right.
- Us the PS button or the O button to get back to where you want to be.


0 Comments