

How to Touch Type: A Complete Guide for Beginners

How to Touch Type: Everything You Need to Know
Today when computers are omnipresent, the need to be fast on a keyboard is a necessity. Typing on the computer without looking at the keyboard, also known as touch typing, is a skill required in many different situations. Maybe you are in a job that is computer-based, or perhaps you are in college; in either scenario, touch typing would indeed make life faster and easier.
So, here I present a simple one-page guide to learn to touch type. Consider this article as a crash course to learn to touch type for free.
In this article, you'll learn how to use all ten fingers to type and which finger to use when pressing a letter, along with detailed and simple instructions.
So, here I present a simple one-page guide to learn to touch type. Consider this article as a crash course to learn to touch type for free.
In this article, you'll learn how to use all ten fingers to type and which finger to use when pressing a letter, along with detailed and simple instructions.
Basics of Touch Typing
Touch typing basically means using all ten fingers to type. Each key on the keyboard is associated with a specific finger. It might be difficult at the start to use all fingers, but as you spend more time practicing, it becomes easier and faster.
Some of you already may have good typing speed, but you do not use all of your fingers. This means you are not utilizing the full potential of your typing capabilities. The process of learning to type is boring, but when it comes to the benefits, they are quite immense.
Some of you already may have good typing speed, but you do not use all of your fingers. This means you are not utilizing the full potential of your typing capabilities. The process of learning to type is boring, but when it comes to the benefits, they are quite immense.

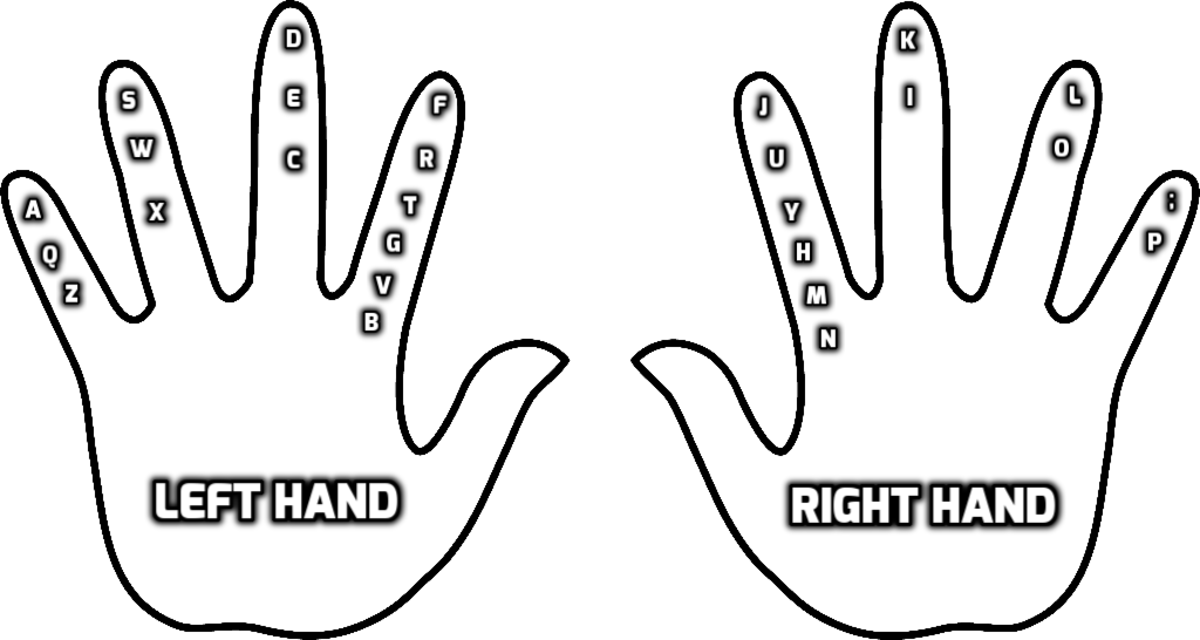
Explanation of the Image
The above image represents the correct finger position for typing. Don't try to do this too fast and without memorizing the keyboard layout first. It will make the process even more difficult, and you might get discouraged. You'll come to know all the positions only by daily practice.
- Red - Keys to be pressed by the left hand with your pinky finger/little finger.
- Orange - Keys to be pressed by the left hand with your ring finger.
- Yellow - Keys to be pressed by the left hand with your middle finger.
- Green - Keys to be pressed by the left hand with your index finger/forefinger.
- Light Blue - Keys to be pressed by the right hand with your index finger/forefinger.
- Dark Blue - Keys to be pressed by the right hand with your middle finger.
- Violet - Keys to be pressed by the right hand with your ring finger.
- Purple - Keys to be pressed by the right hand with your pinky finger/little finger.
- Gray - You should use your thumb for pressing the Spacebar which is shown in gray color.
Which Finger to Use When Pressing a Key
| Letter | Finger | Hand |
|---|---|---|
| q, a, z, Tab, Shift, and Caps Lock | Pinky | Left |
| w, s, and x | Ring | Left |
| e, d, and c | Middle | Left |
| r, f, v, b, g, and t | Index | Left |
| p, ; (Semicolon) , : (Colon), ' (Apostrophe), "" (Quotation Mark), / (Slash), ? (Question Mark), { } (Curly Braces), [ ] (Brackets), \ (Backslash), | (Vertical Bar), Shift, Backspace, and Enter | Pinky | Right |
| o,l, ". (Full Stop)", and > (Greater than) | Ring | Right |
| i, k, ", (Comma)", and < (Greater Than) | Middle | Right |
| u, j, n, m, h, and y | Index | Right |
| Space Bar | Thumb | Right and Left |
Remembering Letter-Finger Association Is Very Important
Typing Numbers

Home Position of Your Hands
Touch typing has a starting position (known as home position) for your hands.
Below is an explanation on how you should place your fingers on the keyboard.
The position of the left hand:
Below is an explanation on how you should place your fingers on the keyboard.
The position of the left hand:
- Little finger on the letter 'a'.
- Ring finger on the letter 's'.
- Middle finger on the letter 'd'.
- Index finger on the letter 'f'.
- Little finger on the letter ';'.
- Ring finger on the letter 'l'.
- Middle finger on the letter 'k'.
- Index finger on the letter 'j'.

How to Remember the Keys
- QWERTY: If you haven't noticed yet all the keyboards will have a similar layout. The design is known as the QWERTY layout. It is an industry standard for keyboard design. Even your smartphone's touch key will use QWERTY.

- F and J Indication: Place your left hand on a, s, d, f and right on j, k, l, ;. There are small little markers on keys F and L. Every keyboard will have it. The purpose of having those markers is to place your hands on them without looking at it.

Using Mnemonics and Almena Jingle
- Mnemonics: One of the most popular methods to remember key location is to create your own mnemonics or rhymes. So far example, for A, S, D, F it could be All Said and Done Finally (middle row, left-hand)
- J, K, L - Just Keep Loving (Middle row, right-hand)
- Q, W, E, R, T, Y - For a new learner, this is the easiest to remember. Right? QWERTY layout (Top row, left-hand except the letter Y)
- P, O, I, U, Y - Park Over In Upper Yard (Top row, right-hand)
- Z, X, C, V - Zoology eXercise Completed (Last row, left hand)
- M, N, B - Monika Never Bores (Last row, right-hand)
- G, H - Go Home (Middle row, centre keys)
- Almena Jingle: Yet another way to remember is this jingle. A lady by the name of Almena King created this to teach keyboarding to elementary school kids. Surely, this can be used by people in any age group. Each sentence represents an alphabet starting from the top towards the bottom. The below is courtesy AlmenaTyping.com.
Want Something eXtra - Left-hand ring finger
Every Dollar Counts - Left-hand middle finger
Run From Vicky To Get Betty - Left-hand index finger
You Have Nothing Uncle Joe's Mad - Right-hand index finger
I'm King Comma - Right-hand middle finger
Over Longer Periods - Right-hand ring finger
Pretty - Left-hand pinky finger
Getting the Right Keyboard
The best thing to do is to get a good, ergonomic keyboard that feels comfortable as doing so will make the learning process much easier. The keyboard of I use is the IBM Model M keyboard. This is an old model, but the keys are properly spaced out. Modern-day keyboards use a rubber-switch beneath the buttons and are so soft that for a new learner it gets tough to know if you pressed the key or not. The benefit of the IBM is that it uses a buckling spring mechanism which makes it a little hard on fingers, but that helps users overcome the issue of not knowing if a key was pressed hard enough. The durability of this keyboard is unquestionable. The one I bought 10-12 years back is still consistent and functional. If you are unable to locate one, I suggest getting the Unicomp Ultra Classic Model M Keyboard. It has many of the same specs as the IBM, and it uses the same buckling spring mechanism.
Another important aspect is not to look at the keyboard while typing. Invariably, one does look at the keys in the learning stages. To avoid this, many people use a special type of keyboard cover which hides the alphabet. This helps in registering key positions in your subconscious mind, but I'm not a big fan of this as it slows down the process initially.
Another important aspect is not to look at the keyboard while typing. Invariably, one does look at the keys in the learning stages. To avoid this, many people use a special type of keyboard cover which hides the alphabet. This helps in registering key positions in your subconscious mind, but I'm not a big fan of this as it slows down the process initially.
Video Tutorial on Typing
Practice Is the Key
In learning to type it all boils down to three points.
- Practice
- Some more practice
- And then some more practice
In how many days you want to learn touch typing?
Free 30 Day Touch Typing Course
In my opinion, if you can devote about 45-60 minutes daily to practicing your typing skills, then you can learn how to touch type in 30 days. And for this goal, I'm outlining a daily training regimen with specific exercises for each day. But ultimately it is the practice, and the dedication that you put in that will show up on the screen, literally!!!
I have written this course with a single exercise for each day. If you want to, you can complete two exercises in a single day and finish this course in 15 days.
For all the exercises below, open the word program on your computer and type for an entire page or two. The more, the better. Save all the work that you've done in a specific folder so that you can evaluate it at a later stage.
If you have a printer, then print those pages and file it in a folder and identify your mistakes and if you are not satisfied with your effort then repeat the exercise once again. Doing that will help you tremendously.
Important Points to Keep in Mind Throughout the Tutorial
Keep your hands at the home position for all the exercise. Do not lift your hands completely away from the home position.
Another thing is if you make mistakes then don't use the backspace button, keep going. Just try not to repeat them.
Day 1 to 7: Basic Typing Lessons
Let's get started.
asdf ;lkj
Start from 'a' and finish with 'j'
It's 'a' from left pinky, 's' from left ring finger, 'd' from left middle finger, and 'f' from the left index finger. Then hit the space bar with your thumb. After that semicolon from your right pinky, 'l' from right ring finger, 'k' from right mid-finger, and finally 'j' from the right index finger.
Then once again press the space bar with your thumb and continue the same sequence for the entire page.
Reminding one more time to keep your hands at the home position. Type the letters only with the fingers associated with them.
'r' from the left index, 't' from the left index, 'y' from the right index and 'u' from the right index. Space with your thumb. Then repeat the same for 2 pages.
Now for further exercises, I won't repeat the fingers associated with the letter. Kindly refer to the above table for reference.
- Day 1
asdf ;lkj
Start from 'a' and finish with 'j'
It's 'a' from left pinky, 's' from left ring finger, 'd' from left middle finger, and 'f' from the left index finger. Then hit the space bar with your thumb. After that semicolon from your right pinky, 'l' from right ring finger, 'k' from right mid-finger, and finally 'j' from the right index finger.
Then once again press the space bar with your thumb and continue the same sequence for the entire page.
- Day 2
Reminding one more time to keep your hands at the home position. Type the letters only with the fingers associated with them.
'r' from the left index, 't' from the left index, 'y' from the right index and 'u' from the right index. Space with your thumb. Then repeat the same for 2 pages.
Now for further exercises, I won't repeat the fingers associated with the letter. Kindly refer to the above table for reference.
- Day 3
- Day 4
- Day 5
- Day 6
- Day 7
Day 8 to 15: Typing Words and More
- Day 8
- Day 9
Type the above sentence as it is, by using shift keys to big alphabets. Use the shift with the correct finger. For example, when typing Stronger press the shift key with your right hand and for Better use your right hand for pressing the shift key.
- Day 10
Type, "There are 30/31 days in a month" for half a page and "There are 7 days in a week" for the other half. "There are 12 months in a year" for the next page. And if you still have steam left, write "365 days make a year".
- Day 11
http://10fastfingers.com/typing-test/english
Visit the above link and take the small 1-minute test to check your speed and accuracy.
At the end of the test, it will show you your speed in WPM (means words per minute) and your accuracy percentage. If your score is 15-20 WPM with 90% accuracy that is considered absolutely good.
- Day 12
Type this for as many pages as you like. After finishing one sequence press the space bar with your thumb and continue. One more point is that if you are right-handed then use your right thumb and left thumb if left-handed.
- Day 13
Type alphabets starting from z and ending and a.
- Day 14
Today's exercise is the most important. If you can do this with ease, then half the battle is done.
Side note: My recommendation is you spend more time practicing the exercises mentioned in the first 14 days. The crux of this tutorial is in the first two-weeks.
- Day 15
Also, type "1 feet equals 30.48 cm" and "1 kg is 2.205 lbs" for 2 pages each.
This is a self-learning tutorial, so you are the best judge of your progress. Rate yourself in the category of not good, okay, or good.
If you find yourself in the first two categories, then repeat this week's exercise for one more week, and I'm sure you will feel much more confident.
Day 16 to 23: Advanced Lessons and Ten Finger Typing
- Day 16
- Day 17
The quick brown fox jumps over the lazy dog
- Day 18
http://www.rapidtyping.com/online-typing-games.html
There are many different games on this website which are a great addition to keep you going.
- Day 19
Crazy Fredericka bought many very exquisite opal jewels
Jackdaws love my big sphinx of quartz. (Use the full stop too)
The five boxing wizards jump quickly.
A quick movement of the enemy will jeopardize six gunboats.
Amazingly few discotheques provide jukeboxes.
- Day 20
http://www.rinkworks.com/words/pangrams.shtml
- Day 21
If it still shows that your WPM is around 10-12 or even less, then you need to practice more.
- Day 22
- Day 23
Day 24 to Day 30: Improving Accuracy and Final Speed Test
- Day 24
- Day 25
Select one which you find interesting and spend some time on it.
- Day 26 to Day 29
- Day 30
Keep Working on It!
Regular practice is the best way to learn touch typing.
What Is the General Acceptable Speed?
Typing speed is calculated by the measure known as WPM. WPM stands for words per minute and any word with 5 or more letters is counted a word. So for example, "I gave" is a counted as a single word and longer words like "friendship" are counted as two words.
The generally accepted WPM is around 35-40 with an accuracy above 90 percent. Some office positions won't even bother to ask your speed.
Jobs such as transcription specialist, secretary to the CEO, and receptionist require speed upwards of 60-70 WPM. For data entry jobs, more speed the better, but the asking speed is more in the range of 70-80 WPM. If you are considering the field of journalism, then touch typing will be of tremendous help. Freelance/online writers often have to adhere to deadlines so they should practice having speeds of over 50 WPM.
The Guinness World Record of fastest realtime typing is held by Mark Kislingbury of Houston, Texas, USA with 360 wpm and accuracy of 97.23%.
Useful Websites and Software
There are scores of websites on the web which offer free lessons, games, free software, and many other ways to learn this. Read as much as possible. Apply the tips which you get from them. Make the process of learning as inclusive as possible.
Below are some of my recommendations:
Below are some of my recommendations:
- RataType.com - This requires signup to use all the features of this website. The learn section on the website has some neatly arranged information. You'll learn about the correct sitting posture, finger motion, and some awesome info-graphics.
- Typing.com - This is a veteran when it comes to such online resources. Here you'll find basic to advanced lessons, games, and a regularly updated blog which features helpful topics on all things typing.
- 10FastFingers.com - My choice of typing test website is this. Typing tests are divided into three sections: easy, advanced, and challenger. There is also an option of competing with other online users. I tried, and it shows a speed of 58 wpm with an accuracy of 98.81%, I'm impressed.
- TypeRacer.com - This is a bit advanced one out there. Visit this once you are through with using all your fingers to type. Unlike others, the primary focus here is increasing your typing speed. You can race with other users or invite your friends.
- TypingGames.zone - This website has a good collection of typing games. This has got a good blend of games like Typing Attack (shooting), Typing Racer (car racing), a remodeled snake game, Type and Jump and Run (like Super Mario).


0 Comments