

DESIGN AND IMPLEMENTATION OF SMARTPHONE MICROSCOPY ON ANDROID/ARDUINO/WINDOWS PLATFORM
BY
OMAIYE, BENJAMIN OHEPO
CS/12/006
ANYATING, GREGORY ADALIKWU
CS/12/057
DEPARTMENT OF COMPUTER SCIENCE, FACULTY OF SCIENCE,
MADONNA UNIVERSITY, NIGERIA.
AUGUST, 2016.
--------------------------------------------------------------------------------------------------------------------------
DESIGN AND IMPLEMENTATION OF SMARTPHONE MICROSCOPY ON ANDROID/ARDUINO/WINDOWS PLATFORM
BY
OMAIYE, BENJAMIN OHEPO
CS/12/006
ANYATING, GREGORY ADALIKWU
CS/12/057
SUBMITTED TO THE
DEPARTMENT OF COMPUTER SCIENCE, FACULTY OF SCIENCE, MADONNA UNIVERSITY, NIGERIA.
IN PARTIAL FULFILMENT OF THE REQUIREMENTS
FOR THE AWARD OF BARCHELOR OF SCIENCE (B.Sc.)
DEGREE IN COMPUTER SCIENCE.
AUGUST, 2016.
CERTIFICATION
This is to certify that this research project on “Design and Implementation of Smartphone Microscopy on Android/Arduino/Windows Platform by Omaiye Benjamin Ohepo with the registration number CS/12/006 and Anyating Gregory Adalikwu with the registration number CS/12/057, met the conditions for the award of Bachelor of Science (B.Sc.) degree in Computer Science, Madonna University, Nigeria. It is hereby approved for its contribution to knowledge.
DECLARATION
We hereby declare that this project on Design and Implementation of Smartphone Microscopy on Android/Arduino/Windows Platform Has been carried out by us Omaiye Benjamin Ohepo CS/12/006 and Anyating Gregory Adalikwu CS/12/057 and is a record of our research work and is a record of our research work reference made to published literature have been duly acknowledge.
DEDICATION
We dedicate this report firstly, to God Almighty for his infinite mercies that he has granted us throughout our stay in Madonna University, also to our family members and many friends. A special feeling of gratitude to our loving parents, Mr & Mrs Bernard Omaiye, Mr & Mrs Gregory Anyating, our wonderful supervisor Mrs Adanma Celia Eberendu whose words of encouragement and push for tenacity ring in our ears. Finally we will like to also dedicate our project to Madonna University, our learned lecturers, wonderful course mates, and well-wishers for been there for us.
ACKNOWLEDGEMENT
First and foremost we want to thank God Almighty for his infinite mercies and grace that kept us going throughout our studies. With high gratitude to our parents, Mr & Mrs Gregory Anyating and Mr & Mrs Bernard Omaiye for their financial and moral support to ensure that our academic pursuit was a successful one. A special thanks to our supervisor Mrs Adanma Ace Eberendu with whom our project was a success. Finally, we want to thank all the staffs and lecturers of Computer Science Department Madonna University, our course mates, friends and well-wishers that have contributed massively towards our academic pursuit.
ABSTRACT
Microscope is an optical device that uses lenses to produce magnified objects that are small to be seen clearly by the naked eye. This bulky and expensive device is used mainly in medical and scientific laboratories and difficult for novice to read. Lecturers guiding new students to focus and interpret microscope readings experience problems because they take turn in focusing at the sample. In order to relieve users of traditional microscope from these problems, this project designed a microscope on Android/Arduino/Windows Platform based on Smartphone microscopy technology. It enhanced a normal Smartphone with special components to readily attain the capability of a domestic microscope which is basically magnification. Android program is written and stored on the Smartphone and Arduino (Arduino Uno) was used to control the brightness of the light source and display. The Smartphone takes a magnified image or video of the sample and stored it in a database developed in Microsoft Access on Visual Basic 2010 platform. The stored magnified samples can be retrieved from the database and used for another purpose.
CHAPTER 1
INTRODUCTION
1.1 Background of the Study
The conventional light microscope as we already know is an important tool used in various fields for specimen viewing, diagnostic and analysis. Now with the introduction of digital imaging, it is now possible to capture picture and record videos of this specimen and transfer the captured samples from place to place for further analysis. In our rural communities and some institutions, this technology is not available. They rely on the light microscope for diagnostic and testing of specimens. Also a conventional light microscope used in our laboratories can only let you view sample but you can’t capture and store specimen in case you want to review it later in the future. A conventional microscope is expensive to purchase especially in our rural communities and institutions whom might not be financially balanced.
In the early 2000, Smartphone microscopy a new and cheaper innovative technology that enables you capture digital microscopic images and videos using a camera enabled phone producing high resolution microscopic data just like a light microscope came to be. But for this device to attain this goal some additional features or enhancements will have to be added to the device, such as software and hardware features.
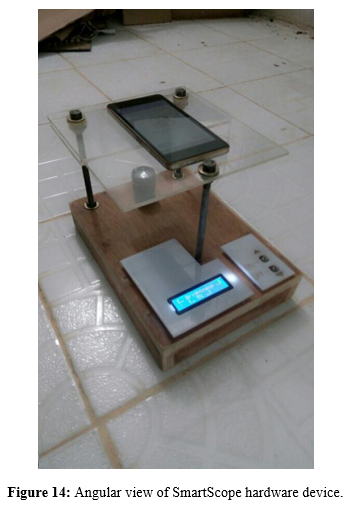
The goal of this project is just to enhance the already existing smartphone microscopy technology. This will be done by developing an android application which will run on the android device. The android application will act as the interface for viewing and capturing of images and videos unto the android device. The resolution of the camera on a smartphone device is not built to take microscopic image, so to enhance this feature a platform containing a Plano-convex lens is used to enhance the magnification of the object for the device camera, a light source for illumination, a 16X2 LED (Light Emitting Diode) to display light brightness, will be built so that the smartphone can easily be mounted on top of it. A computer desktop application will also be developed in case you want to transfer the captured specimen into a computer system or server or a workstation for future reference. The cost of acquiring the smartphone and all its additional will be much cheaper that purchasing an actual light microscope and can be used and acquired by anyone in case you want a unit.
1.2 Problem Definition
The field of science has reached a stage that man does not only have to be aware of what he can only see with his bare naked eyes, in fact what man can see with his bare eyes compare to what he cannot see is on a large displacement. When the both are compared with each other, the later tops the chart, thus there is a huge need for what can make him reach that limit. This is when the role of a microscope come in to play. However as time passes by, the use of microscope has faced certain challenges, which can be referred to as the constraints the traditional microscope faces, there include;
· The Bulky And Fragile Nature Of The Traditional Light Microscope:- Due to the bulky nature of the traditional compound microscope, it is so uncomfortable to carry about in order to work with it, aside that its parts and components are usually made up of fragile and delicate materials that really need to be handled with care.
· Inability Of The Traditional Light Microscope To Save Samples That Are Been Viewed: - The traditional light microscope does not have the ability to save or retain samples being viewed, i.e. it is designed or built to run in “Real-Time”.
· Expensiveness of the Traditional Light Microscope: - Due to the expensive nature of the light microscope, especially when it comes to purchases, one can easily be discouraged on how much a unit cost.
Nevertheless, smartphone microscopy to a normal man on the street can be seen as a tool in his hands, especially when it comes to the close looking up of tiny things that will be strenuous for the naked human eyes to see, or the identification of every day materials e.g. identifying a fake Naira note from an original Naira note by looking in closely on details printed on them.
1.3 Aim and Objectives
The aim of embarking on this project topic is to clearly show and demonstrate how a traditional compound light microscope can be mimicked from a digital perspective using some specially built hardware, together with a smartphone running Android and an Arduino.
The objectives of the topic will be narrowed down as shown below:-
· Since the traditional light microscope is some worth bulky in terms of weight and size, usually made up of fragile components, most people find it difficult to carry about and use, this will be resolved in our development by making use of lightweight durable materials such as plywood and Plexi glass and narrowing our design to fit within less than 30cm in length, width and height.
· The traditional light microscope can only enable you view samples by just looking at it and then you write down what you see based on your observation but with SmartScope you will not just look at samples but you can also capture and save samples on the smartphone device and also on a personal computer via the desktop version of SmartScope for future reference.
· More also a conventional light microscope as we know it is quite expensive to purchase , so for this reason, SmartScope was developed using cheap but efficient materials to minimize cost. So you are getting almost the same functionality of a normal conventional light microscope plus added features at a very cheap rate.
1.4 Significance of the Study
With a good understanding of this document, one should have become very familiar to what smartphone microscopy is, the basic principle on how it works and operates, the different approaches that smartphone microscopy can be archived,
1.5 Scope of the Study
This research will mainly cover the design and implementation of smartphone microscopy on android powered devices alongside with windows to support the desktop application. Thus the implementation will not work on, IOS, Java and Symbian powered devices.
1.6 Limitations
On the course of our research on smartphone microscopy, there were limitations which we experienced that really made the task a little bit difficult for us. Below are some of the limitations which we came across:-
· Difficulties with getting access to the internet. Due to the poor internet infrastructure around in our various locality, it’s a tedious task whenever one wants to access the web, even if you have the best devices in hand, you still can’t access the web due to poor internet infrastructure established.
· With smartphone microscopy being a new innovation in its early stage, detailed materials are not much deposited on the internet, thus hindering us from getting into a much more detailed study of the subject topic.
· Once again poor electricity supply was also a crucial issue we faced during the research, it really hindered us in such a way that the device we used mainly for the research which is our laptop is an electronic device, thus with poor electricity supply, we mostly had an idle time during the.
· We experience computer system breakdown due to faulty components which we were able to tackle by backing up necessary files and documents on external drives as well as sharing of such documents on the internet via emails.
1.7 Glossary
· SmartScope: - It is simply the name of the android program that we will develop that will be used to achieve our microscopy.
· Smartphone: - It is a mobile phone with more advanced features and greater computing capacity than a normal phone.
· Microscope: - An optical instrument used for observing or viewing small object that might be so tiny for the human eyes to see.
· Microscopy: - It is basically the use of microscopes and its applications.
· Lens: - An object usually made of glass that focuses or defocuses the light that passes through it.
· Ocular lens: - The eyepiece lens of a microscope or other optical instrument.
· Light Source: - It is simply the source of illumination i.e. the source of light.
· Magnification: - It is simply the act of magnifying or enlargement of an object in an image.
· Arduino (UNO):- This is a prototyping microcontroller board with an ATMEGA328P-PU chip mounted on the board that support both analogue and digital functions.
· LED (Light Emitting Diode): - It is basically a p-n junction diode that generate light when induced with voltage.
· LCD (Liquid Crystal Display) Screen: - This is a display panel, it is an electronic visual display that uses light modulating properties of liquid crystals to display on its screen.
· JPEG (Joint Photographic Experts Group): - It is basically an image compression standard.
· MPEG4 (Moving Pictures Experts Group 4): - It is a computer file format for the compression and storage of digital video and audio data.
· Vero Board: - It is referred to as a prototyping circuit board that is made up of copper strips to which electronics components can be mounted on.
· Jumper Wires: - Are thin insulated copper wires used in prototyping for connecting electric components together.
· Plexi Glass: - A tough transparent plastic used sometimes in place of glass.
· Tact Switches: - This is an On and Off electronic switch that only works when you press or tap its button, it is referred to as a “Make or Break” switch.
· Tooltip: - An element of a graphical user interface in the form of a box of text that appears when a cursor is made to hover over an item; normally used to explain the function of the item.
· Operating System: - Is a software that controls the allocation and usage of hardware resources such as memory, central processing unit time, disk space and input/output devices.
1.8 Organization of the Chapters
Chapter 1 introduces the background of study of smartphone microscopy in details and what it is all about. The problem statement. The aim and objectives of the study on smartphone microscopy. The significant of the study. The scope of the study and then the limitations encountered during study.
Chapter 2 presents a review of literature and relevant research associated with the problem addressed in this study.
Chapter 3 presents the methodology and procedures used for data collection and analysis. The software requirement used during study which can be subdivided in hardware and software requirement. The functional requirement of study as well as the non-functional requirement of study.
Chapter 4 presents the program design which contain the flow chart of all processes and programs, isomeric diagram of SmartScope circuitry and electric circuit design. The input design which contain the interfaces of the android application, SmartScope desktop database etc. The output design which contain the final output of the intended system developed and the test plan for the system.
Chapter 5 presents the system implementation which include system testing. The user testing. The documentation which contain the user manual, installation guide and troubleshooting procedures.
Chapter 6 presents a summary, evaluation, problems encountered and finally the lessons learnt and recommendations for future research.


CHAPTER 2
LITERATURE REVIEW
Description of Smartphone Microscopy
Smartphone microscopy, which we referred to as (SmartScope) in our work is a new innovation that broke out after the development of smartphones, it basically involves the use of smartphones accompanied with some special materials all put together to mimic the main ability of a traditional compound microscope, which is simply to “magnify” up objects under view to a high ratio compare to its original size.
The development of smartphone devices has really opened up opportunities for engineers and scientists to easily add or append sensors of several varieties, with each performing its own function, and other electronic components such as the camera, which is the key factor or element the smartphone microscopy will be built on. With all this in place, the smartphone is not just a normal traditional phone for only making phone calls any more, but indeed a smartphone as it is called, with its ability to house a good number of functionalities it can perform, in fact making it a computing device that can stand alone on its own.
Based on the existing works on smartphone microscopy, different people have designed and implemented their own smartphone microscope in the desired way in which they most preferred. Despite their differences in design and implementation, they all still arrived at the main goal, and that is mimicking the traditional compound microscope, with the sole purpose of magnifying whatever that is under view.
The diagram below shows work on smartphone microscopy from (Yoshino, 2013)


(Yoshino, 2013), mainly paid attention to “Cost”, where he uses $10 (approximately N2000) to get all what he will be needing to set up all the necessary materials and requirements that he will use alongside with his smartphone that will in turn enable him to capture and deliver a microscopic snap shot of up to a magnification of 175X the initial size of an object, and again with the assistance of a second lens made available to him, he was able to get a magnification of up to 375X the initial size of the object respectively i.e. more than 2X magnification of the single lens. With everything in place he was able to get a microscopic view and snapshot of various sample ranging from grain of salts and sugar crystals down to plant cell and their nuclei. He further mentioned that his sole purpose or aim is to design and build a hardware that can be used alongside with a smartphone to provide an alternative microscopy over existing expensive traditional microscope.
Features that (Yoshino, 2013) could have enhanced in his work to make it more rich;
Light: - In the field of photography and microscopy, light is a crucial issue that is meant to be attended to with immediate effect, because light plays a vital role in viewing of samples via the ocular lens and the objective of the domestic light microscope, that is to say that, the amount of light emitted from the light source of the light microscope has a maximum effect on the sample and the person viewing the sample. Also in photography, the amount of light emitted from the object and the amount of light entering the camera via the camera lens contributes maximal to the quality and effect of the object.
With this issue pin pointed out, it will be solved in SmartScope using Arduino Uno prototyping board that will be programmed to control the brightness and dimness of the LED (Light Emitting Diode) bulb using button (Tact Switches), thus the LED bulb which is our light source for the SmartScope can easily be controlled in terms of its brightness and dimness as the case may be, and finally the value and result of the brightness or dimness of the LED bulb is then displayed on a 16x2 LCD (Liquid Crystal Display) screen for the operator to see.
Saving of Data (Pictures & Videos): - Once again Kenji Yoshino was able to save his captured pictures and videos but not in an efficient way. When the pictures and videos are captured, they are stored in the pictures and videos location of the smart phone device precisely; fine, but the captured contents gets mixed up with media contents also taken by the device, thus making it tedious and difficult to locate the captured microscopic images and videos.
This is easily going to be corrected in SmartScope by writing an android program using Android Studio that will make use of an “Intent” to call the domestic camera application pre-installed and running on the device to still capture images and videos, but this time gives one the chance to rename or tag the captured content be it pictures or videos with a unique name and format, thus our captured content will all be collected in one place, with each one placed side by side in the storage location of the device.
The following diagrams below shows work on smartphone microscopy from (Lansey, 2015)


Also, according to the works of (Lansey, 2015), he saw “Time” as a key factor to consider in developing his own microscopic device he will use alongside with his smartphone to capture a good and detailed microscopic shot as well as capturing good videos.
Before the first microscope was developed by Anthony Van Leeuwenhoek, which took him a good deal of time with maximum effort and work in order for him to put together all what it takes to develop the first microscope. Anthony Van Leeuwenhoek was the first man to build and make use of a real microscope, and the microscope he developed was able to attain a magnification of up to 270X the actual size of an object.
Coming back to Lansey’s work, he use a total time of 10 minutes to put in place all what it takes to deliver a microscopic shot of an object, unlike Anthony Van Leeuwenhoek which took him almost a century (91 years) to build his own microscope. So far, comparing both of their work, Lansey’s work has an upper edge in terms of delivery time compared to that of Anthony Van Leeuwenhoek.
Furthermore, Lansey’s microscope still has more advantages compared to that of Anthony Van Leeuwenhoek’s own in terms of “Portability”. The formal work was smart enough to fit into ones pocket based on how he built it together with his smart phone. Compared to that of Anthony Van Leeuwenhoek’s own that will surely require a table or work space to be placed on in order to function properly.
However, despite the fact that the works of Lansey’s was smart in terms of delivery time and portability, they are still some constraints faced by his work which will absolutely be corrected in the developed of SmartScope, one of them is;
Absence of a Platform/View Stand: - His design was mainly mounting an optical lens using cello tape, and some other cruel padding materials to hold the mounted lens in place as he takes the microscopic shot or record a video via the lens mounted on his smart phone. From one’s own point of view, his approach towards the design of his work is cruel, and will same time have a high tendency of affecting his shots and recording of video negatively due to “shakes” from his hands as he captures the moment of an object through his device. His design requires one to hold the smartphone mounted with the optical lens with the smartphone camera over the desired object to be captured in order to record a microscopic video or snapshot. By this doing, as one holds the device, there is high chances of shakes and vibration from the persons hands due to stability of the device to capture the desired moment. Based on this, the captured microscopic video or snapshot may suffer from poor view quality after the moment has been captured, thus the captured moment will tend to appear very blur due to shakes as it is been captured.
In SmartScope, this flop will be easily corrected by building a portable, light platform stand made up of light weight acrylic material and plywood. All this will be put together to build a platform in which one can place his or her smartphone, then with the aid of some fasteners to hold in place the smartphone when capturing moments. This will in turn reduce vibration and shakes since the smartphone is now resting on the platform and leaving only the screen of the smartphone to be accessed by the operator.
Furthermore from the works of (Abeynaike, 2012) he came from the dimension of the medical field. What he really focus on is the interrelationship of smartphone devices with medical laboratory equipment. His studies clearly shows that smartphone devices have not yet attained their optimum potential with the laboratory, and there are still some constraints left to overcome in order to make it a possibility, and when that is done scientist and researchers will embrace the smartphone as a time saving and cost effective device that will be of necessity within the laboratory and also amongst scientist and researchers. He clearly stated some of the constraints that might be hindering the smartphone devices from attaining its optimum potential with the laboratory and they are as follows:
Health and Safety: The issue of health and safety is a serious affair that every researcher or scientist must having in mind when working in the laboratory. Since the laboratory also houses hazardous substances ranging from human and animal fluids/tissues and also corrosive substances etc., will be unsafe for one to access his or her personal belonging such as the smartphone, since removal of protective gears and gloves to access ones smartphone can be dangerous and disruptive during experiments in laboratory session.
Security: Since the laboratory is not just a place meant for only one person, keeping of ones belonging such as the smartphone within the laboratory is not a good idea at all since ones privacy can be bridge or ones belonging can be misplaced within the laboratory.
Distractions: It has been confirmed by some scientists and researchers that have their smartphone with them within the laboratory is a source of distraction for them, since the spontaneous series of text messages, phone calls, email notification etc., will hardly stop coming. Thus, one must be very careful and focus in order for their attention to not be diverted.
(Abeynaike, 2012) Was able to carry out a survey on a group of scientists and researchers in his work to find out what basically they use their smartphone for during work within the laboratory. The result from the survey clearly shows that they use their smartphones for accessing emails, contacting colleagues, calendars/to-do list and transferring data. However, only a few from the survey carried out tend to use applications on their smartphone related to their specific field or area of specialisation, majorly the application used mainly consist of timers and basic calculator.
Nevertheless, having all this in mind, the prospect of smartphone applications or hardware attachments would be a means to save money and space, and will be particularly of great benefits to lower income laboratories.
According to (Morrison & Gardner, 2013) they all saw things from the perspective of photography in general and how it is of more benefit to practitioners when integrated with the traditional light microscope using the smartphone. They made a point that “when interesting microscopic findings or discoveries are made, photographing such findings will really go a long way in helping practitioners, especially in the medical field when it comes to interdepartmental communication amongst colleagues, presentation, teaching etc. on the course of their research”. Never the less the idea of using the smartphones might not be the best solutions when it comes to capturing of microscopic images, but it could be the best alternative-for-gone when “cost minimization” is meant to be paid serious attention to; why because traditional photomicroscopes with mounted camera are extremely costly, thus limiting their use by practitioners. Their own concept basically relies on the use of the traditional camera mounted on the smartphone, then with some basic smartphone photography techniques of holding and focusing the camera over the ocular lens of the available microscope which the image is to be captured from.

Deficiency of This Technique
Ø It can be frustrating to learn this technique during the initial stage even though it’s easy to master.
Ø To be able to successfully capture a microscopic image using this technique you must be able to hold your camera steady else the might be distortion in final result.
Features That Can Improve This Technique
Ø Using a steady robotic or fixed arm to hold camera steady rather than holding yourself.
Ø A simplified step by step guide should have been developed to assist in the proper implementation of this technique.
According to (Sowerby, Crump, Johnstone, & Hill, 2016) A Nokia Lumia smartphone was been configured to take image of an Ova of Ascaris Lumbricoides converged in a single field of view but on different focal planes. The device was configured to take pictures at various distance into a single field of view and using public domain computer software, composite images were generated that brought all the ova into sharp focus.
Features and Operation
Fluid wells in A and D below installed in Micro-I cassettes in E allows the analysis of 0.5 ml of liquid sample. A cassette rack and a bespoke cradle that will hold the smartphone device in F and G. A double convex objective lens 12mm in diameter, effective focal length 18mm and a back focal length 16.81, centre thickness (3.48+-0.01 mm). The cassette rack positioned the tip of the rod (14.90+-0.2 mm) in front of the lens G. A white light emitting diode installed in the front part of the cradle help to illuminate the rod. A software application was created using graphical user interface to pre-set the smartphone digital zoom (1 to 3x) and indicate the amount of and focal position of images along the optical axis. The software was also used to set the smartphone optical stage to its midpoint and the height of the cassette rack can be adjusted.

Gaps in the Literature
Microscopy on its own using the domestic light microscope has faced a challenging aspect, and that is the aspect of saving samples as they are been viewed.
The works above were able to attain this to an extent but none built an application or software to do this, they mainly use the domestic camera on the smartphone to do this which is not flexible. To resolve this issue we are developing an android camera application that can enable us to take photos and videos, manipulate the photos and videos file name and store them in a particular location or space in the memory.
Also in the of the light source for those that used it on implementing their smartphone microscopy, they were not able to control the brightness and dimness of their light source, but we will be able to tackle this issue by using Arduino UNO to control the LED light source as well as display the brightness of the light source on the LCD screen.
CHAPTER 3
SYSTEM ANALYSIS
3.1 Data Collection Methods
The Data collection Method we used on the course of our research on the project mainly have their sources from the internet, there include basically rich content articles, journals, well defined and properly laid out manuals on microscopes and a couple of media (video tutorials) which were all gotten from genuine and trusted sources.
3.2 System Requirements
It will classified or subdivided into two main categories which are: The Hardware Requirements and The Software Requirements.
3.2.1 Hardware Requirements
The Hardware requirements of the system includes:-
· Computer System (Laptop): -It is the medium that will be used for documentation of the research work, writing the android program, Arduino sketch, also for burning codes to the Arduino circuit board.
· Android Smartphone (with camera equal to or greater than 5 mega pixels): - This will house the android application that will be created.
· Arduino Circuit Board (Arduino Uno): - This will house the Arduino sketch that will be used to control our LED bulb alongside the switches.
· LCD Screen (16X2 Character Display): - This will be used to display the brightness level of the LED bulb on a scale of 0-100.
· Vero Board: -This is where all the available and necessary electronic components will be soldered upon to yield our circuitry for the system.
· Resistor (320ohms): -This will be used to control the flow of current to the LCD Screen and the LED bulb.
· LED Bulb: -This will be used as our light source to brighten up specimen to be viewed.
· Jumper Wires: -This will be used as connection lines for our circuit.
· Tact Switches: - This will be used to control the brightness or dimness of the LED bulb by tapping them.
· Plexi Glass: -This is basically going to be the platform in which the smartphone and specimen sample will be placed upon.
· Ply Wood: -this will be the platform that will house the all the hardware components.
· Bolt/Nut/Washers/Butterfly Screw: -This will be used for fastening and assembling of movable parts of the systems.
· DC Battery (9v): -This will be our power source that will be used to power the circuit
· USB Drive: - This was used for mainly backup of our research documents and application source codes in case we have a computer break down.
3.2.2 Software Requirements
The software requirements of the intended system includes: -
· Android Studio: -It will be used to develop and build the android application that will in turn be ran on the smartphone.
· Arduino IDE: - This will be used to write the Arduino sketch that will be burned to the Arduino circuit board.
· Microsoft Word: - It was mainly used in typesetting and documenting all our findings during the research.
· Corel Draw (X7): - It will be used to design the electric circuit and also the isometric build layout of the system.
· Visual Basic: - This programming language and IDE will be used to create the desktop version of SmartScope and also linking our database to MS-Access used for storing the captured samples on a computer system.
3.3 Functional Requirements
Input Requirements
This is mainly concerned with capturing the sample to be viewed which is already set up on the slide. It will involve the operator i.e. the person using the system to first set up what is to be viewed on the sample slide, then using the smartphone mounted on the SmartScope device, the sample is then captured and waiting for the processing phase to be carried out. Once each capture is made (i.e. picture or video), be it picture or video, it is then saved unto the database which can be displayed on the screen when Visual Basic program is executed.
Processing Requirements
This phase processing phase involves the storage aspect of the system i.e. writing to disk the captured sample, be it picture or video. As the sample is captured via the smartphone mounted on the device, if the captured sample was a picture, it will saved as a JPEG (Joint Photographic Expert Group) format in a folder called “SMARTSCOPE PHOTOS” with a naming format of “SMARTSCOPE_HHmmss_ddMMyyyy_.jpg”, but if it was a video that was captured, it will be saved as MPEG4 (Moving Pictures Experts Group 4) format in a folder called SMARTSCOPE VIDEOS with a naming MPEG4 (Moving Pictures Experts Group 4) format of “SMARTSCOPE_HHmmss_ddMMyyyy_.mp4”. So with chosen format the captured sample can be seen laying side by side to each other in the folder as they are captured.
Output Requirements
This is the final phase in the performance of the system. It comprises the display of the picture file of the captured sample in JPEG (Joint Photographic Experts Group) or a video file of the sample in MPEG4 (Motion Pictures Experts Group 4) format as seen in the previous phase. The stored sample if wanted can be sent or shared via Bluetooth to other Bluetooth devices or printed on paper or photo paper as the case may be. This is made possible by storing the captured samples in their appropriate folders, thus one can easily go back to the folder and location where they are stored to easily retrieve the captured sample of their choices.
3.4 Non Functional Requirements
With the intended system fully developed it will be able to handle the following as shown below: -
· User Friendly: - The system to be developed will be user friendly since most actions will require one to make use of the system by clicking, tapping and rotary actions, thus no keyboard stroking. Apart from that, the widgets on the interface will not contain complicated grammars, and will contain tooltip thus yielding easy usage and understanding.
· Availability: - the application will be readily available since a copy of it will be hosted online on google play store for free download, thus any one can easily access and download it from any part of the world.
Efficiency: -The software will be efficient, since the size of the application on the ROM (Read Only Memory) of the device will be less than 10 megabytes, and on the Arduino board it will be less than a megabyte, thus utilizing memory space. This is made possible by using programing language that has garbage collection implemented in them e.g. Java which will be used for the android programming.
CHAPTER 4
SYSTEMS DESIGN
4.1 Program Design
SmartScope Flowchart for Android Application

SmartScope Flowchart for Windows Application

SmartScope Flowchart for Wooden Platform

SmartScope Electric Circuit Design

3D Isometric Design View of SmartScope Platform

Schematic Diagram of Arduino Uno


4.2 Input Design
Smartphone Launch Page: - Here, it will only require the user to lunch the SmartScope application from the homepage or menu of the android device, by just tapping the SmartScope icon shown on the screen. Diagram as shown below;


4.3 Output Design
The final output of the intended system to be developed will be basically the captured pictures and videos of samples that have been already setup up on the platform.

4.4 Test Plan
The table below comprises of the test plan:-
Test Plan for SmartScope Android Application
Table 1: Test Plan for SmartScope Android Application
S/N
|
Test Case
|
Test Data
|
Expected Result
|
Result
|
1.
|
Launching SmartScope Android Application
|
Tap the SmartScope icon on the android device menu
|
SmartScope splash screen should load and also pop up the home page of the application
|
SmartScope splash screen load successfully, and home page was popped up after the splash screen finish loading.
|
2.
|
Camera Snap Shot
|
Tapping the photo button on the SmartScope home page
|
The android device camera should be lunched ready to take a photo.
|
The device camera is lunched and ready to take picture.
|
3.
|
Video Camera Recording
|
Tapping the Video button on the SmartScope home page
|
The android device camera should be lunched ready to record video.
|
The device camera is lunched and ready to record a video.
|
4.
|
Storing Captured Photo Samples To Memory
|
The captured photo by the camera is appended the SmartScope filename and time stamp and stored in the Picture folder by the android operating system.
|
The captured photo should be appended the correct filename and timestamp and stored in the Picture folder.
|
The captured photo is appended the correct filename and timestamp and stored in the Picture folder
|
5.
|
Storing Recorded Video Samples To Memory
|
The recorded video by the camera is appended the SmartScope filename and time stamp and stored in the Video folder by the android operating system.
|
The recorded video should be appended the correct filename and timestamp and stored in the Picture folder.
|
The recorded video is appended the correct filename and timestamp and stored in the Video folder
|
6.
|
Retrieving Stored Photo Samples From Memory Test
|
One will need the filename of the captured image and the location where the captured image is stored in other to retrieve the stored image.
|
The captured image sample should be easily retrieve using the correct filename and location already existing in the memory.
|
Indeed the image sample was easily retrieved from memory using the correct filename and location.
|
7.
|
Retrieving Stored Video Samples From Memory Test
|
One will need the filename of the recorded video and the location where the recorded video is stored in other to retrieve the stored video.
|
The recorded sample should be easily retrieve using the correct filename and location already existing in the memory.
|
Indeed the video sample was easily retrieved from memory using the correct filename and location.
|
Test Plan for SmartScope Windows Application
Table 2: Test Plan for SmartScope Windows Application.
S/N
|
Test Case
|
Test Data
|
Expected Result
|
Result
|
1.
|
Launching SmartScope Desktop Application
|
Double clicking the SmartScope icon on the desktop.
|
SmartScope splash screen should load and also pop up the home page of the desktop application
|
SmartScope desktop splash screen load successfully, and windows home page was popped up after the splash screen finish loading.
|
2.
|
Adding New Sample
|
Click the “Add New” button.
|
The Sample ID will be incremented by 1 and all the required input field will be cleared.
|
The sample ID was incremented by 1 and all input required field cleared, but the Sample Scientific Name field is disabled, unless Pharmacy or Biology is selected in the Department combo box.
|
3.
|
Clearing All Fields
|
Click the “Clear All Fields” button.
|
Clears all the input fields including the picture field, but the Sample ID will still remain displayed.
|
All the input fields including the picture field were all cleared, and the Sample ID still remain displayed.
|
4.
|
Navigating Through Stored Records
|
Click the “Previous” or “Next” button.
|
When “Previous” button is clicked it traverse left through the stored records, and when the “Next” button is clicked it traverse right through the stored records.
|
The “Previous” button when clicked traverse left through the stored records, and when the “Next” button is clicked it traverse right through the stored records.
|
5.
|
Deleting Stored Records
|
Click the “Delete” button.
|
The current displayed record will be deleted from the record set.
|
The current displayed record was deleted from the record set.
|
6.
|
Saving Records
|
Click the “Save” button.
|
The Entered records in the input fields will be stored to the Access Database embedded into the program.
|
Entered records were successfully saved to the Access Database embedded into the program.
|
7.
|
Uploading Images
|
Click the “Upload Image…” button
|
The Open File Dialog Window will pop up to enable you select and upload an image to the application.
|
Open File Dialog Window popped up and an image was selected and uploaded to the application.
|
8.
|
Exiting The Application
|
Click the “Exit” button
|
The SmartScope Application should terminate and end
|
SmartScope Application was terminated.
|
Chapter 5
SYSTEMS IMPLEMENTATION
The system was developed using Android studio for the design and development of SmartScope Android application as well as Microsoft visual studio for the design and development of the SmartScope Desktop application. SmartScope Android codes were written using Java programming Language and XML for styling, while SmartScope desktop application codes were written using Visual basic.
5.1 Testing
Table 3: Performing test plan for SmartScope android application.
S/N
|
Test Case
|
Test Data
|
Expected Result
|
Result
|
1.
|
Launching SmartScope Android Application
|
Tap the SmartScope icon on the android device menu
|
SmartScope splash screen should load and also pop up the home page of the application
|
SmartScope splash screen load successfully, and home page was popped up after the splash screen finish loading.
|
2.
|
Camera Snap Shot
|
Tapping the photo button on the SmartScope home page
|
The android device camera should be lunched ready to take a photo.
|
The device camera is lunched and ready to take picture.
|
3.
|
Video Camera Recording
|
Tapping the Video button on the SmartScope home page
|
The android device camera should be lunched ready to record video.
|
The device camera is lunched and ready to record a video.
|
4.
|
Storing Captured Photo Samples To Memory
|
The captured photo by the camera is appended the SmartScope filename and time stamp and stored in the Picture folder by the android operating system.
|
The captured photo should be appended the correct filename and timestamp and stored in the Picture folder.
|
The captured photo is appended the correct filename and timestamp and stored in the Picture folder
|
5.
|
Storing Recorded Video Samples To Memory
|
The recorded video by the camera is appended the SmartScope filename and time stamp and stored in the Video folder by the android operating system.
|
The recorded video should be appended the correct filename and timestamp and stored in the Picture folder.
|
The recorded video is appended the correct filename and timestamp and stored in the Video folder
|
6.
|
Retrieving Stored Photo Samples From Memory Test
|
One will need the filename of the captured image and the location where the captured image is stored in other to retrieve the stored image.
|
The captured image sample should be easily retrieve using the correct filename and location already existing in the memory.
|
Indeed the image sample was easily retrieved from memory using the correct filename and location.
|
7.
|
Retrieving Stored Video Samples From Memory Test
|
One will need the filename of the recorded video and the location where the recorded video is stored in other to retrieve the stored video.
|
The recorded sample should be easily retrieve using the correct filename and location already existing in the memory.
|
Indeed the video sample was easily retrieved from memory using the correct filename and location.
|
Table 4: Performing test plan for SmartScope Desktop application.
S/N
|
Test Case
|
Test Data
|
Expected Result
|
Result
|
1.
|
Launching SmartScope Desktop Application
|
Double clicking the SmartScope icon on the desktop.
|
SmartScope splash screen should load and also pop up the home page of the desktop application
|
SmartScope desktop splash screen load successfully, and windows home page was popped up after the splash screen finish loading.
|
2.
|
Adding New Sample
|
Click the “Add New” button.
|
The Sample ID will be incremented by 1 and all the required input field will be cleared.
|
The sample ID was incremented by 1 and all input required field cleared, but the Sample Scientific Name field is disabled, unless Pharmacy or Biology is selected in the Department combo box.
|
3.
|
Clearing All Fields
|
Click the “Clear All Fields” button.
|
Clears all the input fields including the picture field, but the Sample ID will still remain displayed.
|
All the input fields including the picture field were all cleared, and the Sample ID still remain displayed.
|
4.
|
Navigating Through Stored Records
|
Click the “Previous” or “Next” button.
|
When “Previous” button is clicked it traverse left through the stored records, and when the “Next” button is clicked it traverse right through the stored records.
|
The “Previous” button when clicked traverse left through the stored records, and when the “Next” button is clicked it traverse right through the stored records.
|
5.
|
Deleting Stored Records
|
Click the “Delete” button.
|
The current displayed record will be deleted from the record set.
|
The current displayed record was deleted from the record set.
|
6.
|
Saving Records
|
Click the “Save” button.
|
The Entered records in the input fields will be stored to the Access Database embedded into the program.
|
Entered records were successfully saved to the Access Database embedded into the program.
|
7.
|
Uploading Images
|
Click the “Upload Image…” button
|
The Open File Dialog Window will pop up to enable you select and upload an image to the application.
|
Open File Dialog Window popped up and an image was selected and uploaded to the application.
|
8.
|
Exiting The Application
|
Click the “Exit” button
|
The SmartScope Application should terminate and end
|
SmartScope Application was terminated.
|
5.1.1. Launching SmartScope Android Application
The SmartScope icon tapped from smartphone device menu, SmartScope splash screen load successfully, and home page was popped up after the splash screen finish loading as shown below;

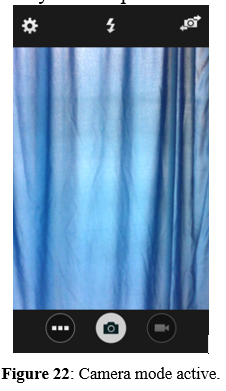
5.1.2. Camera Snap Shot
The device camera is lunched and ready to take picture as shown below;
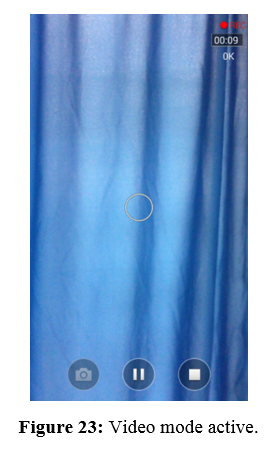
5.1.3. Video Camera Recording
The device camera is lunched and ready to record a video as shown below;
5.1.4. Storing Captured Photo Samples to Memory
The captured photo is appended the correct filename and timestamp and stored in the Picture folder as shown below;

5.1.5. Storing Recorded Video Samples to Memory
The recorded video is appended the correct filename and timestamp and stored in the Video folder as shown below;

5.1.6. Retrieving Stored Photo Samples from Memory Test
The image sample retrieved from memory using the correct filename and location as shown below;

5.1.7. Retrieving Stored Video Samples from Memory Test
The Video sample retrieved from memory using the correct filename and location as shown below;

5.1.8. Launching SmartScope Desktop Application
The SmartScope desktop icon clicked from computer system icons menu, SmartScope desktop splash screen loading successfully, and home page was popped up after the splash screen finish loading as shown below;

The sample ID was incremented by 1 and all input required field cleared, but the Sample Scientific Name field is disabled, unless Pharmacy or Biology is selected in the Department combo box as shown below;

5.1.8. Clearing All Fields
All the input fields including the picture field were all cleared, and the Sample ID still remain displayed.
5.1.9. Navigating Through Stored Records
The “Previous” button when clicked traverse left through the stored records, and when the “Next” button is clicked it traverse right through the stored records as shown below;

5.1.10. Deleting Stored Records
The current displayed record was deleted from the record set as shown below;

5.1.11. Saving Records
Entered records were successfully saved to the Access Database embedded into the program as shown below;

5.1.12. Uploading Images
Open File Dialog Window popped up and an image was selected and uploaded to the application as shown below;

5.1.13. Exiting the Application
SmartScope Application was terminated as shown below;

5.2 User Testing
In this section of our research work, we were able to get two user to carry out the testing.
The first test was for forensics testing, where the user will test for characters printed on paper from two different printers i.e. printer A and printer B using a particular character “D”. The tester will watch out for variation between the two samples
Aim: SmartScope can be easily used for document forgery detection and also forensics case.
Result: Is as shown below: -


Remarks from Tester
· SmartScope was easy to operate.
· SmartScope is user friendly due to simplicity of design and build.
The second test was for simple magnification testing of small lives around us. Here the user caught a mosquito to closely look at it in details, spotting out some important feature of the sample such as the head and the proboscis.
Aim: SmartScope can be easily used for learning at ones disposal.
Result:
Remarks from Tester
· The result from SmartScope was indeed close to the ones he to sees in the laboratory.
· SmartScope is easier to maintain compare to the domestic microscope made up of fragile components.
5.3 Documentation
This part of the document serves as a guide by which a user gets to know how to use the various software in detail. It contains the user manual, the installation guide, and troubleshooting in case something goes wrong during the course of the software installation or usage.
User Manual
The user manual has a unique function which is to guide a user on how to use the SmartScope system which comprises the SmartScope android application, the SmartScope Windows application, and the SmartScope Arduino platform.
SmartScope Android Application
This will guide the user on how to use the SmartScope Android application running on android.
1. Getting the SmartScope Android Application
The SmartScope Android application (i.e. SmartScope.apk) which we built from Android Studio is burnt to a CD drive which is already available and attached to this document. So using a computer, one can share the SmartScope.apk by copying it into an android device (preferably and android phone), ready for the installation phase.

2. Installing SmartScope Android Application
The easiest way to install this software is to run the SmartScope.apk just like you will do with any other android application by locating the SmartScope.apk and tapping the SmartScope.apk once it has been copied to your android device. The result of the action will pop up a menu with “Install” button, tap the “Install” button and wait, while the installation is done a menu will pop up saying “App Installed” tap the “Done” button to close the menu, or tap “Open” to launch the SmartScope application.

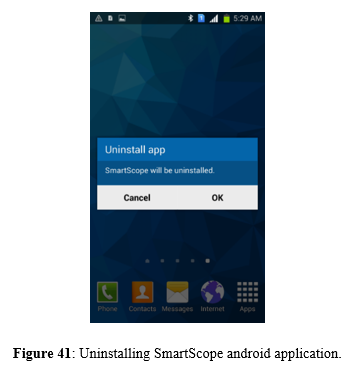
3. Uninstalling SmartScope android application
To uninstall SmartScope Android application you tap and drag the SmartScope icon on your device to the “uninstall” icon on the menu, a window will pop up asking you “SmartScope will be uninstalled.”, tap the “OK” button to uninstall.
4. Use of software
Once you have downloaded and installed SmartScope android application unto your device, the next thing for you to do is to launch the application by tapping the SmartScope application icon on the menu to open it. Once SmartScope is opened unto its homepage, it is now ready to use. Just select what you wish to do either capture photo or record video as you wish.

Installation Guide
SmartScope android application will run on any android device with the following specification;
· A minimum of Android 4.0 ( Kit Kat) operating system
· A minimum of 500 Megabyte(MB) of RAM space
· A minimum of 1 Gigabyte(GB) internal memory
· Device Camera of at list 5 Mega pixel and above.
SmartScope Windows Desktop Application
This will aid the user on how to use the SmartScope desktop application running on windows.
Download of software
SmartScope Desktop application can run on any windows based computer system. You can get this software to your computer by copying the SmartScopeDesktop.exe setup file from another computer that already has SmartScope Desktop application into a flash drive or any external memory drive you have. Once copied on the external drive you can now copy from the external drive to a memory location of your choice on the new computer in which you want to use.

Installation of software
The easiest way to install this software is to go the memory location where the SmartScope Desktop is and locate the SmartScope.exe, double click it to run the software just like you will do with any other software.
Uninstallation of software
To uninstall this software you go to control panel application on your computer, select uninstall a program under Program menu and then you search for SmartScope desktop amongst the list of installed software and you follow the instructions as specified on how to uninstall.

Use of software
Once you have installed SmartScope desktop application unto your computer, the next thing for you to do is to launch the application by double clicking the SmartScope Desktop application icon to lunch the application. Once SmartScope desktop application lunched, the first windows to pop out is the splash screen to keep the user busy, and finally followed by the homepage of the application.

Adding New Records
Once the application homepage is running, you click on “Add New” button to input a new record. The SampleID automatically increment by one, then filling in all the available fields with the appropriate data, and finally uploading the sample picture and hit the “Save” button to write to the database. To add a new record again, you just repeat the process all over.

Navigating Through the Stored Records
You click the “Next” button to traverse Right of the stored records, then clicking the “Previous” buttons traverse Left of the stored records.

Deleting Stored Records
You use the navigation buttons to find the record you want to delete and the click on the “Delete” button to delete the record from the record sets.

Clearing All Record Fields
Clicking on the “Clear All Fields” button clear or remove a particular set of fields inserted in the records, note that once this is done you cannot undo the task and that record is lost and you may have to start all over.
Uploading an Image
To upload an image into the application, you simply click on the “Upload Image…” button, an open file dialog window will pop up, navigate to the location where your image is stored select the image, then click “Open” automatically the image will be loaded to the database and displayed on the homepage of the application.

Installation Guide
SmartScope Desktop application will run on any computers running the windows operating system with the following specifications;
* Processor can be AMD or Intel
* Operating system (32 bit or 64-bit) : Windows 7 and above
* Random Access Memory (RAM) 1GB and above
* Hard disk drive space of 100GB and above
Troubleshooting
On the course of our design and implementation of smartphone microscopy on android/arduino/windows platform, we encountered a serious issue which is more of an Original Equipment Manufacturer (OEM) issue. As we developed SmartScope Android Application, we noticed that the application can be install on all android devices, but when the application is ran on some android devices it crashes, show a message “Unfortunately, SmartScope has stopped.”. This is as a result of OEM’s which are not fully supported by the Android operating system. Example of OEM’s fully supported by the android operating system are; Nexus, Samsung, HTC and Sony.
To troubleshoot and resolve this issue, one should OEM android devices which are fully supported by the android operating system.

CHAPTER 6
CONCLUSION
6.1 Summary
This research work was aimed at enhancing the already available innovation of smartphone microscopy technology which enabled you capture digital microscopic images, record high resolution videos and saving unto the device (i.e. android or windows) memory for later use by mimicking the functionality of a traditional microscope we already know. Taking into account other works been done on smartphone microscopy by other researchers we figured out a better and efficient way to do what they had done already by designing and implementing a smartphone microscopy system which we call “SmartScope”. First of all, this new system will have an android application that will capture the digital images and videos of samples, a desktop database application that store the samples when you transfer from the android device to a computer system and the wooden platform containing Plano convex lens, light source, 16x2 LED display etc. all put together to enhance the android device camera capability. Therefore with this research smartphone microscopy has been made cheaper, better and efficient and we hope that with time improvement can be done to enhance it further.
6.2 Evaluation
The research on Design and Implementation of Smartphone Microscopy on Android/Arduino platform was very important and successful. The software’s developed and platform built will really be of great importance to those it may concern and there is room for further improvement as time goes by.
6.3 Problems Encountered
On the course of our research on smartphone microscopy, there were series of problems which we encountered that really made the task a little bit difficult for us. Below are some of the problems we encountered:-
· Once again poor electricity supply was also a crucial issue we faced during the research, it really hindered us in such a way that the device we used mainly for the research which is our laptop is an electronic device, thus with poor electricity supply, we mostly had an idle time during the.
· With smartphone microscopy being a new innovation in its early stage, detailed materials are not much deposited on the internet, thus hindering us from getting into a much more detailed study of the subject topic.
· We experience computer system breakdown due to faulty components which we were able to tackle by backing up necessary files and documents on external drives as well as sharing of such documents on the internet via emails.
· Difficulties with getting access to the internet. Due to the poor internet infrastructure around in our various locality, it’s a tedious task whenever one wants to access the web, even if you have the best devices in hand, you still can’t access the web due to poor internet infrastructure established.
6.4 Lessons Learnt
Unquantifiable invaluable lessons were learnt during the course of this project, our knowledge in algorithms, design and implementation was vastly improved.
There was an improvement in our knowledge of Android Studio and how it works, the different important files Android studio generate and how to maintain them (i.e. the java file, the Extensive Markup Language (XML) file, the Manifest file etc.) and how to maintain them, more also how it generates an android application and it interacts with the android operating system as a whole.
Our knowledge of databases and how it works work was also greatly improved. We got to learn how to use the Microsoft visual studio 2010 in designing a database and then linking it to Microsoft access.
Using Arduino, we learnt how to write algorithms using its programming language (which is of the C++ style) and how to code its hardware chip which we had never done before until now.
6.5 Recommendation
REFERENCES
Abeynaike, L. (2012, March 23). Qualitative Study on the Applications of Smartphones in Medical Research. (J. Whitefield, & P. Hopper, Eds.) Journal of Mobile Technology in Medicine, I(3), 19-23. doi:10.7309/jmtm.7
Hale, & Alan. (2007, April 30). Microscope Basics. (H. Wood, & S. W. Grace Bill, Eds.) Microscopes, 3-19. Retrieved May 23, 2016
Lansey, J. (2015, April 1). JONATHAN LANSEY. Retrieved June 10, 2016, from JONATHAN LANSEY: http://www.jonathan.lansey.net/pastimes/microscope/index.html
Massimo, Federico, Arturo, Cristian, & David. (2012, January 28). Arduino_Uno_Rev3-schematic.pdf. Retrieved April 16, 2016, from Arduino: https://www.arduino.cc/en/uploads/Main/Arduino_Uno_Rev3-schematic.pdf
Morrison, A. S., & Gardner, J. M. (2013, November 7). Smart Phone Microscopic Photography (A Novel Tool for Physicians and Trainees). Archives of Pathology & Laboratory Medicine, 138, 1002. doi:10.5858/arpa.2013-0425-ED
Sowerby, S., Crump, J. J., Johnstone, M. C., & Hill, P. C. (2016). Smartphone Microscopy of Parasite Eggs Accumulated into a Single Field of View. New zealand: The America society press.
Yoshino, K. (2013, March 28). Instructables. Retrieved May 20, 2016, from Instructables: http://www.instructables.com/id/10-Smartphone-to-digital-microscope-conversion/?ALLSTEPS
APPENDIX
SmartScope Arduino Codes
/*
This Arduino SmartScope sketch simply demonstrates the use a 16x2 (16 Pins)LCD display, two push buttons, an LED bulb and the arduino serial monitor to handle the lighting and display of brightness level for the Android SmartScope Application. The push buttons are for increasing and decreasing the brightness of the LED bulb all hooked-up to the arduino. With all this in place the value of the LED brightness is displayed clearly on the LCD screen for visualization.
__LCD Configuration Layout__
* LCD RS pin to digital pin 12
* LCD Enable pin to digital pin ~11
* LCD D4 pin to digital pin ~5
* LCD D5 pin to digital pin 4
* LCD D6 pin to digital pin ~3
* LCD D7 pin to digital pin 2
* LCD R/W pin to ground
* LCD VSS pin to ground
* LCD VCC pin to 5V
* 10K resistor:
* Ends to +5V and ground
* Wiper to LCD VO pin (pin 3)
__Circuit Layout__
*LED +ve pin to digital pin ~9
*LED -ve pin to ground
*Push button 1(increase): one end to digital pin 8 and the other end to ground.
*Push button 2 (decrease): one end to digital pin 7 and the other end to ground.
*/
#include <LiquidCrystal.h> // LCD library importation.
int brightness = 0; // LED brightness variable
LiquidCrystal lcd(12, 11, 5, 4, 3, 2); // LCD pin initialization for data transmission.
void setup() {
pinMode(7,INPUT_PULLUP); // Set pin 7 to be in input mode
pinMode(8,INPUT_PULLUP); // Set pin 8 to be in input mode
pinMode(9,OUTPUT); // Set pin 9 to be in output mode
Serial.begin(9600); // baud rate for serial monitor connection with arduino.
lcd.begin(16, 2); // set up the LCD's number of columns and rows:
lcd.print("[_ Brightness _]"); // Print "Brightness" message to the LCD, still remains after LCD Screen is cleared.
}
void loop() {
lcd.print("[_ Brightness _]"); // Print "Brightness" message to the LCD, still re-appears after LCD Screen is cleared.
lcd.setCursor(3,2); // Set cursor to column 3 and row 2 of LCD screen.
lcd.print("[_ "); // -------------------------------------
lcd.print(brightness); // print the value of brightness to LCD.
lcd.print("% _]"); // -------------------------------------
if(digitalRead(7) == LOW){
brightness = brightness - 5; // If button on pin 7 is pressed, reduce brightness by 5.
}
delay(10); // delay for 10 milliseconds.
if(brightness < 0) brightness = 0; // Don't let brightness drop below 0.
if(digitalRead(8) == LOW){
brightness = brightness + 5; // If button on pin 8 is pressed, increase brightness by 5.
}
delay(10); // delay for 10 milliseconds.
if(brightness > 100) brightness = 100; // Don't let brightness get above 100.
analogWrite(9, brightness); // Set pin 9 to the new brightness level
delay(1); // Wait for 1 milliseconds.
Serial.println(brightness); // print the value of brightness to the serial monitor.
lcd.setCursor(3,2); // Set cursor to column 3 and row 2 of LCD screen.
delay(250); // delay for 250 milliseconds.
lcd.clear(); // clear the LCD screen for a new value of brightness to be displayed.
}
SmartScope Android Studio Codes
SmartScopeMainActivity.java Codes
package com.example.android.smartscope;
// Importing all the necessary libraries
import android.content.Intent;
import android.graphics.Bitmap;
import android.graphics.BitmapFactory;
import android.graphics.Matrix;
import android.media.ExifInterface;
import android.net.Uri;
import android.os.Environment;
import android.provider.MediaStore;
import android.support.v7.app.AppCompatActivity;
import android.os.Bundle;
import android.view.View;
import android.widget.Button;
import android.widget.ImageView;
import android.widget.Toast;
import java.io.File;
import java.io.IOException;
import java.text.SimpleDateFormat;
import java.util.Date;
public class SmartScopeMainActivity extends AppCompatActivity {
// value to check for camera state (photo).
private static final int Activity_Start_Camera_App = 0;
//imageView variable.
private ImageView mPhotoCapturedImageView;
// clearing image file location to assume empty.
private String mImageFileLocation = "";
// declaration of the video button.
private Button mRecordView;
// value to check for camera state (video).
private int ACTIVITY_START_CAMERA_APP = 0;
@Override
protected void onCreate(Bundle savedInstanceState) {
super.onCreate(savedInstanceState);
setContentView(R.layout.activity_smart_scope_main);
//initializing the imageView variable
mPhotoCapturedImageView = (ImageView) findViewById(R.id.capturePhotoImageView);
//initializing the videoButton variable
mRecordView = (Button) findViewById(R.id.videoButton);
//Setting up the OnClickListener for video recording.
mRecordView.setOnClickListener(new View.OnClickListener() {
@Override
public void onClick(View v) {
Intent callVideoAppIntent =new Intent();
callVideoAppIntent.setAction(MediaStore.ACTION_VIDEO_CAPTURE);
startActivityForResult(callVideoAppIntent,ACTIVITY_START_CAMERA_APP);
}
});
}
public void takePhoto(View view) {
//calling the camera
Intent callCameraApplicationIntent = new Intent();
//camera should take picture
callCameraApplicationIntent.setAction(MediaStore.ACTION_IMAGE_CAPTURE);
File photoFile =null;
try {
photoFile = createImageFile();
}catch (IOException e) {
e.printStackTrace();
}
callCameraApplicationIntent.putExtra(MediaStore.EXTRA_OUTPUT, Uri.fromFile(photoFile));
startActivityForResult(callCameraApplicationIntent,Activity_Start_Camera_App);
}
//this function returns to the app after picture is taken.
protected void onActivityResult(int requestCode, int resultCode, Intent data) {
if (requestCode == Activity_Start_Camera_App && resultCode == RESULT_OK) {
//toast for tooltip.
Toast.makeText(this, "Action Successful", Toast.LENGTH_SHORT).show();
rotateImage(setReducedImageSize());
}
}
File createImageFile()throws IOException {
// Formating the timestamp.
String timeStamp = new SimpleDateFormat("HHmmss_ddMMyyyy").format(new Date());
// Appending the timestamp to file name.
String imageFileName = "SmartScope_" + timeStamp + "_";
//location our pictures will be saved.
File storageDirectory = Environment.getExternalStoragePublicDirectory(Environment.DIRECTORY_PICTURES);
File image = File.createTempFile(imageFileName, ".jpg", storageDirectory);
mImageFileLocation = image.getAbsolutePath();
return image;
}
// This function aids to reduce image size to fit right into image view to utilize RAM space.
private Bitmap setReducedImageSize() {
int targetImageViewWidth = mPhotoCapturedImageView.getWidth();
int targetImageViewHeight = mPhotoCapturedImageView.getHeight();
BitmapFactory.Options bmOptions =new BitmapFactory.Options();
bmOptions.inJustDecodeBounds = true;
BitmapFactory.decodeFile(mImageFileLocation, bmOptions);
int cameraImageWidth = bmOptions.outWidth;
int cameraImageHeight = bmOptions.outHeight;
int scaleFactor = Math.min(cameraImageWidth / targetImageViewWidth, cameraImageHeight / targetImageViewHeight);
bmOptions.inSampleSize = scaleFactor;
bmOptions.inJustDecodeBounds = false;
return BitmapFactory.decodeFile(mImageFileLocation, bmOptions);
}
//image rotate function
private void rotateImage(Bitmap bitmap) {
ExifInterface exIfInterface =null;
try {
exIfInterface =new ExifInterface(mImageFileLocation);
}catch (IOException e) {
e.printStackTrace();
}
int orientation = exIfInterface.getAttributeInt(ExifInterface.TAG_ORIENTATION, ExifInterface.ORIENTATION_UNDEFINED);
Matrix matrix =new Matrix();
switch (orientation) {
case ExifInterface.ORIENTATION_ROTATE_90:
matrix.setRotate(90);
break;
case ExifInterface.ORIENTATION_ROTATE_180:
matrix.setRotate(180);
break;
default:
}
Bitmap rotateBitmap = Bitmap.createBitmap(bitmap, 0, 0, bitmap.getWidth(), bitmap.getHeight(), matrix, true);
mPhotoCapturedImageView.setImageBitmap(rotateBitmap);
}
}
activity_smart_scope_main.xml Codes
<?xml version="1.0" encoding="utf-8"?>

<RelativeLayout xmlns:android="http://schemas.android.com/apk/res/android"

    xmlns:tools="http://schemas.android.com/tools"

    android:layout_width="match_parent"

    android:layout_height="match_parent"

    android:paddingBottom="@dimen/activity_vertical_margin"

    android:paddingLeft="@dimen/activity_horizontal_margin"

    android:paddingRight="@dimen/activity_horizontal_margin"

    android:paddingTop="@dimen/activity_vertical_margin"

    tools:context="com.example.android.smartscope.SmartScopeMainActivity">


    <ImageView

        android:id="@+id/capturePhotoImageView"

        android:layout_width="match_parent"

        android:layout_height="match_parent"

        android:layout_above="@+id/photoButton"

        android:layout_alignParentEnd="true"

        android:layout_alignParentLeft="true"

        android:layout_alignParentRight="true"

        android:layout_alignParentStart="true"

        android:adjustViewBounds="false"

        android:background="#d4d4d4"

        android:cropToPadding="false"

        android:scaleType="centerCrop"

        android:src="@drawable/smartscopeblackk" />


    <Button

        android:id="@+id/photoButton"

        android:layout_width="wrap_content"

        android:layout_height="wrap_content"

        android:layout_alignParentBottom="true"

        android:layout_alignParentLeft="true"

        android:layout_alignParentStart="true"

        android:layout_marginTop="5dp"

        android:background="@drawable/smartscopebutton"

        android:capitalize="none"

        android:focusable="false"

        android:onClick="takePhoto"

        android:singleLine="true"

        android:text="Photo"

        android:textAlignment="center"

        android:textColor="#ffffff"

        android:textSize="50px"

        android:textStyle="normal" />


    <Button

        android:id="@+id/videoButton"

        android:layout_width="wrap_content"

        android:layout_height="wrap_content"

        android:layout_alignParentBottom="true"

        android:layout_alignParentEnd="true"

        android:layout_alignParentRight="true"

        android:layout_below="@+id/capturePhotoImageView"

        android:layout_marginTop="5dp"

        android:background="@drawable/smartscopebutton"

        android:capitalize="none"

        android:enabled="true"

        android:focusable="false"

        android:onClick="recordVideo"

        android:singleLine="true"

        android:text="Video"

        android:textAlignment="center"

        android:textColor="#ffffff"

        android:textSize="50px"

        android:textStyle="normal" />


    <Button

        android:id="@+id/button"

        android:layout_width="wrap_content"

        android:layout_height="wrap_content"

        android:layout_alignParentBottom="true"

        android:layout_centerHorizontal="true"

        android:background="@drawable/smartscopelinedivider" />


</RelativeLayout>
AndroidManifest.xml Codes
<?xml version="1.0" encoding="utf-8"?>

<manifest xmlns:android="http://schemas.android.com/apk/res/android"

    package="com.example.android.smartscope">


    <uses-permission android:name="android.permission.WRITE_EXTERNAL_STORAGE" />


    <application

        android:allowBackup="true"

        android:icon="@mipmap/ic_launcher"

        android:label="@string/app_name"

        android:supportsRtl="true"

        android:theme="@style/AppTheme">

        <activity android:name=".SpalshScreen">

            <intent-filter>

                <action android:name="android.intent.action.MAIN" />


                <category android:name="android.intent.category.LAUNCHER" />

            </intent-filter>

        </activity>

        <activity android:name=".SmartScopeMainActivity" />

    </application>


</manifest>
SpalshScreen.java Code
package com.example.android.smartscope;


// importing the necessary libraries.

import android.content.Intent;

import android.os.Bundle;

import android.support.v7.app.AppCompatActivity;


/**

 * Created by Benjamin & Gregory on 15/08/2016.

 */

public class SpalshScreen extends AppCompatActivity {


    @Override

    // this is the splashscreen function.

    protected void onCreate(Bundle savedInstanceState) {

        super.onCreate(savedInstanceState);

        setContentView(R.layout.splash_screen);

        Thread mySplashScreenThread = new Thread() {

            @Override

            public void run() {

                try {

                    // the suspend for 3seconds i.e 3000milliseconds

                    sleep(3000);

                    Intent startSmartScope = new Intent(getApplicationContext(), SmartScopeMainActivity.class);

                    startActivity(startSmartScope);

                    finish();

                } catch (InterruptedException e) {

                    e.printStackTrace();

                }

            }

        };

        mySplashScreenThread.start();

    }

}
splash_screen.xml Codes
<?xml version="1.0" encoding="utf-8"?>

<LinearLayout xmlns:android="http://schemas.android.com/apk/res/android"

    android:layout_width="match_parent"

    android:layout_height="match_parent">


    <ImageView

        android:layout_width="match_parent"

        android:layout_height="match_parent"

        android:id="@+id/imageView"

        android:src="@drawable/smartscopesplashscreen" />

</LinearLayout>
SmartScope Desktop Visual Basic Codes
SmartScope Desktop.vb Codes
Public Class frmSmartScopeDesktop
'This subroutine handles the database of the SmartScope Desktop application.
Private Sub SmartScopeDatabaseTableBindingNavigatorSaveItem_Click(sender As System.Object, e As System.EventArgs) Handles SmartScopeDatabaseTableBindingNavigatorSaveItem.Click
Me.Validate()
Me.SmartScopeDatabaseTableBindingSource.EndEdit()
Me.TableAdapterManager.UpdateAll(Me.SmartScopeDatabaseDataSet)
End Sub
Private Sub Form1_Load(sender As System.Object, e As System.EventArgs) Handles MyBase.Load
' This line of code loads data into the 'SmartScopeDatabaseDataSet.SmartScopeDatabaseTable' table.
Me.SmartScopeDatabaseTableTableAdapter.Fill(Me.SmartScopeDatabaseDataSet.SmartScopeDatabaseTable)
'Initialising the default text for the Department field.
cboDepartment.Text = "-Select Department-"
cboDateDay.Text = "-Day-"
cboDateMonth.Text = "-Month-"
cboDateYear.Text = "-Year-"
'Loading text items for the Department field.
cboDepartment.Items.Add("Medical Laboratory Science")
cboDepartment.Items.Add("Microbiology")
cboDepartment.Items.Add("Biochemistry")
cboDepartment.Items.Add("Pharmarcy")
cboDepartment.Items.Add("Biology")
'Loading text items for the Day field.
cboDateDay.Items.Add("1")
cboDateDay.Items.Add("2")
cboDateDay.Items.Add("3")
cboDateDay.Items.Add("4")
cboDateDay.Items.Add("5")
cboDateDay.Items.Add("6")
cboDateDay.Items.Add("7")
cboDateDay.Items.Add("8")
cboDateDay.Items.Add("9")
cboDateDay.Items.Add("10")
cboDateDay.Items.Add("11")
cboDateDay.Items.Add("12")
cboDateDay.Items.Add("13")
cboDateDay.Items.Add("14")
cboDateDay.Items.Add("15")
cboDateDay.Items.Add("16")
cboDateDay.Items.Add("17")
cboDateDay.Items.Add("18")
cboDateDay.Items.Add("19")
cboDateDay.Items.Add("20")
cboDateDay.Items.Add("21")
cboDateDay.Items.Add("22")
cboDateDay.Items.Add("23")
cboDateDay.Items.Add("24")
cboDateDay.Items.Add("25")
cboDateDay.Items.Add("26")
cboDateDay.Items.Add("27")
cboDateDay.Items.Add("28")
cboDateDay.Items.Add("29")
cboDateDay.Items.Add("30")
cboDateDay.Items.Add("31")
'Loading text items for the Month field.
cboDateMonth.Items.Add("January")
cboDateMonth.Items.Add("February")
cboDateMonth.Items.Add("March")
cboDateMonth.Items.Add("April")
cboDateMonth.Items.Add("May")
cboDateMonth.Items.Add("June")
cboDateMonth.Items.Add("July")
cboDateMonth.Items.Add("August")
cboDateMonth.Items.Add("September")
cboDateMonth.Items.Add("October")
cboDateMonth.Items.Add("November")
cboDateMonth.Items.Add("December")
'Loading text items for the Year field.
cboDateYear.Items.Add("1990")
cboDateYear.Items.Add("1991")
cboDateYear.items.add("1992")
cboDateYear.Items.Add("1993")
cboDateYear.Items.Add("1994")
cboDateYear.Items.Add("1995")
cboDateYear.Items.Add("1996")
cboDateYear.Items.Add("1997")
cboDateYear.Items.Add("1998")
cboDateYear.Items.Add("1999")
cboDateYear.Items.Add("2000")
cboDateYear.Items.Add("2001")
cboDateYear.Items.Add("2002")
cboDateYear.Items.Add("2003")
cboDateYear.Items.Add("2004")
cboDateYear.Items.Add("2005")
cboDateYear.Items.Add("2006")
cboDateYear.Items.Add("2007")
cboDateYear.Items.Add("2008")
cboDateYear.Items.Add("2009")
cboDateYear.Items.Add("2010")
cboDateYear.Items.Add("2011")
cboDateYear.Items.Add("2012")
cboDateYear.Items.Add("2013")
cboDateYear.Items.Add("2014")
cboDateYear.Items.Add("2015")
cboDateYear.Items.Add("2016")
cboDateYear.Items.Add("2017")
cboDateYear.Items.Add("2018")
cboDateYear.Items.Add("2019")
cboDateYear.Items.Add("2020")
'Setting up the image property of the picture box to center and stretch.
BackgroundImageLayout = ImageLayout.Center
BackgroundImageLayout = ImageLayout.Stretch
End Sub
'This subroutine traverse left of the stored records.
Private Sub btnPrevious_Click(sender As System.Object, e As System.EventArgs) Handles btnPrevious.Click
SmartScopeDatabaseTableBindingSource.MovePrevious()
End Sub
'This subroutine traverse left of the stored records.
Private Sub btnNext_Click(sender As System.Object, e As System.EventArgs) Handles btnNext.Click
SmartScopeDatabaseTableBindingSource.MoveNext()
End Sub
'This subroutine adds new record to the database.
Private Sub btnAddNew_Click(sender As System.Object, e As System.EventArgs) Handles btnAddNew.Click
SmartScopeDatabaseTableBindingSource.AddNew()
End Sub
'This subroutine saves records to the database.
Private Sub btnSaveEdit_Click(sender As System.Object, e As System.EventArgs) Handles btnSaveEdit.Click
SmartScopeDatabaseTableBindingSource.EndEdit()
SmartScopeDatabaseTableTableAdapter.Update(SmartScopeDatabaseDataSet.SmartScopeDatabaseTable)
End Sub
'This subroutine deletes a record from the record set.
Private Sub btnDelete_Click(sender As System.Object, e As System.EventArgs) Handles btnDelete.Click
SmartScopeDatabaseTableBindingSource.RemoveCurrent()
End Sub
'This subroutine terminates the SmartScope Desktop application.
Private Sub btnExit_Click(sender As System.Object, e As System.EventArgs) Handles btnExit.Click
End
End Sub
'This subroutine opens up the file dialog window and allows you enter file name
Private Sub btnUpload_Click(sender As System.Object, e As System.EventArgs) Handles btnUpload.Click
ofdImage.ShowDialog()
If ofdImage.FileName > "" Then
picSampleImage.ImageLocation = ofdImage.FileName
End If
End Sub
Private Sub SampleScientificNameTextBox_TextChanged(sender As System.Object, e As System.EventArgs) Handles txtSampleScientificName.TextChanged
End Sub
Private Sub RectangleShape1_Click(sender As System.Object, e As System.EventArgs)
End Sub
Private Sub ShapeContainer1_Load(sender As System.Object, e As System.EventArgs) Handles ShapeContainer1.Load
End Sub
Private Sub SampleIDLabel_Click(sender As System.Object, e As System.EventArgs)
End Sub
Private Sub SampleDescriptionLabel_Click(sender As System.Object, e As System.EventArgs)
End Sub
Private Sub DepartmentLabel_Click(sender As System.Object, e As System.EventArgs)
End Sub
Private Sub SampleNameLabel_Click(sender As System.Object, e As System.EventArgs)
End Sub
Private Sub SampleScientificNameLabel_Click(sender As System.Object, e As System.EventArgs)
End Sub
'This subroutine checks if the Pharmacy is selected, then the Scientific Name field should be enabled.
Private Sub cboDepartment_SelectedIndexChanged(sender As System.Object, e As System.EventArgs) Handles cboDepartment.SelectedIndexChanged
If cboDepartment.Text = "Pharmarcy" Then
txtSampleScientificName.Enabled = True
End If
End Sub
'This subroutine clears all the entry field.
Private Sub btnClearAllFields_Click(sender As System.Object, e As System.EventArgs) Handles btnClearAllFields.Click
txtSampleName.Text = ""
txtSampleScientificName.Text = ""
cboDepartment.Text = ""
rtxtSampleDescription.Text = ""
picSampleImage.Image = Nothing
cboDateDay.Text = ""
cboDateMonth.Text = ""
cboDateYear.Text = ""
End Sub
Private Sub txtSampleName_TextChanged(sender As System.Object, e As System.EventArgs) Handles txtSampleName.TextChanged
End Sub
Private Sub SmartScopeDatabaseTableBindingSource_CurrentChanged(sender As System.Object, e As System.EventArgs) Handles SmartScopeDatabaseTableBindingSource.CurrentChanged
End Sub
Private Sub SmartScopeDatabaseTableBindingNavigator_RefreshItems(sender As System.Object, e As System.EventArgs) Handles SmartScopeDatabaseTableBindingNavigator.RefreshItems
End Sub
End Class
SplashScreen.vb Codes
Public Class frmSplashScreen
Private Sub frmSplashScreen_Load(sender As System.Object, e As System.EventArgs) Handles MyBase.Load
End Sub
'This subroutine handles the progress bar in cordination with the timer to vary the text
'at different milestone of the progress.
Private Sub tmSplashScreen_Tick(sender As System.Object, e As System.EventArgs) Handles tmSplashScreen.Tick
pbSplashScreen.Increment(1)
If pbSplashScreen.Value = 30 Then
lblSettingUpInterface.Visible = True
End If
If pbSplashScreen.Value = 60 Then
lblSettingUpInterface.Text = "Linking SmartScope Database..."
End If
If pbSplashScreen.Value = 90 Then
lblSettingUpInterface.Text = "Starting..."
End If
'This condition checks when the progress bar milstone reaches 100, then the
'SmartScopeDesktop form should be activated.
If pbSplashScreen.Value = 100 Then
frmSmartScopeDesktop.Show()
Me.Hide()
End If
End Sub
Private Sub Label3_Click(sender As System.Object, e As System.EventArgs) Handles Label3.Click
End Sub
End Class


![How To Fill Western Union Receive Teller [Photo]](https://blogger.googleusercontent.com/img/b/R29vZ2xl/AVvXsEjbVZjSLIvWZ1X-ttiQaJgVsNMTkBsqudoVEohv6_8yTN4hH3t7thn7F07x_uszKQ1a67uX3MPYmBuoj0HBT0mVTBo-NZz-PRn-my16gI1NAvv4mz2BuOF6hvVpseykeTyJW7FT4lc8zEk/w100/How+To+Fill+Western+Union+Receive+Teller+%255BPhoto%255D.jpg)


3 Comments
Desenvolvido convicções para negócios digitais.
ReplyDeleteWell done Ben.
ReplyDeleteThanks Perry
Delete